|
|
|
|
| Place mouse over 'Training' menu above to display extra options |
| Page Location: Home > Training > Information Sheets > #03 Imaging Print Masters with PG-5 |
|
|
|
|
| Place mouse over 'Training' menu above to display extra options |
| Page Location: Home > Training > Information Sheets > #03 Imaging Print Masters with PG-5 |
|
|
|||
|
|
|||
|
|
Imaging Print Masters with PRINT GOCCO PG-5 model
Firstly, you must have your artwork prepared ready for imaging - see Artwork Types & Preparation if unsure.
For best results your artwork must be carbon based and free of moisture.
How to Image Print Masters
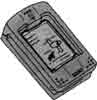
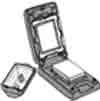
| Open PG-5 lid, and place a piece of card onto the Pad Table [ensure plastic protector is removed from Pad Table]. | |
|
|
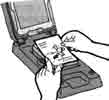
Insert B6 HM Print Master into the Stage Glass with the plastic flap of the Master facing the stage glass [smooth side facing you]. Insert the bottom edge first, that with the arrow pointing downwards |
 |
Place artwork onto the Pad Table in a position ready for
imaging. Remember: Insert Blue Filter if required between the Print Master and Stage Glass at this time. |
 |
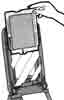
Lower the lid of the PG-5 and view that your artwork is within the frame area - It is best to allow 5mm around each edge. If the artwork has moved or is not inside the frame area, lift the lid and re-position. |
 |
Insert Print Lamps into Lamp Housing by twisting into the holes. Note: the Print Lamps will only screw in one direction. |
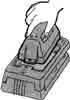  |
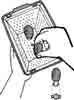
Insert Lamp Housing into PG-5 lid by sliding the back in first [aligning the arrows] and then lowering the front [The front being the side with the two metal tags]. Push down so as the Lamp Housing locks into position. |
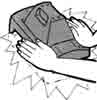 |
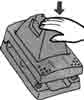
Place the palms of your hand on the two
front corners and push down until the machine flashes - HOLD THE
UNIT DOWN FOR 4-5 SECONDS or until the lamps stop cracking. This
allows the heat to correctly image the design. Raise the handles back to a resting position and remove the Lamp Housing - CAUTION the Print Lamps will be hot. Place the Lamp Housing face up so excess heat can freely escape - if you have gloves, or tough skin, you can remove the Print Lamps from the Lamp Housing at this stage. |
 |
Lift the lid of the PG-5 and remove the Print Master - you are now ready to ink your design. |
It's that simple and easy to make a Print Master - Just ensure that your artwork is prepared and free of moisture for the best result every time.