|
|
|
|
| Place mouse over 'Training' menu above to display extra options |
| Page Location: Home > Training > Information Sheets > #20 Inking Techniques for PRINT GOCCO |
|
|
|
|
| Place mouse over 'Training' menu above to display extra options |
| Page Location: Home > Training > Information Sheets > #20 Inking Techniques for PRINT GOCCO |
|
|
|||
|
|
|||
|
|
Inking Techniques for PRINT GOCCO Print Masters - Press Printing & Stamp Printing
With 29 colours available from the tube, plus millions more when the colours are mixed, your design can be further enhance through the use of some very simple inking techniques.
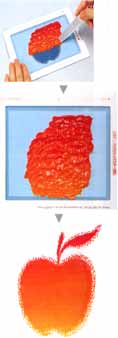
When inking your screen it's important to understand how the composition and layout of your design will effect your inking options, as whilst the colours will not blend/ mix they will shift slightly due to pressure.
 How
to stop colours from moving
How
to stop colours from movingFour common inking techniques include:
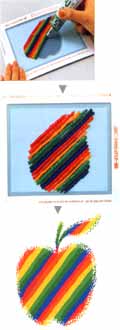
Choose a small number of desired colours to apply to your design.
Place the colours in a repetitive pattern onto the Print Master at a 45 degree angle. The angle and direction of the ink can be changed to better suit the individual design or to your personal preference.
Repeat the ink colours until all the design area has been covered.
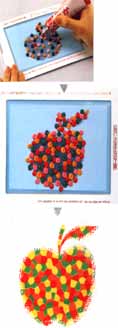
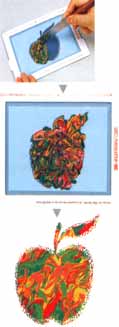
Select a series of colours and place random dots of ink over your design.
Tip: By applying an even amount of ink in each application this will ensure the pattern remains consistent and will reduce any ink movement once printing commences.
Select your colours, noting which colour/s you wish to be the dominant colours in the final print as ink colours are placed on top each other with the most dominant colour placed last. Remember to look at your design and judge the total amount of ink required to cover the design [remember excess ink can be stored for later use] as you will need to apply this amount of ink to your pallet board.
On a pallet board [card or plastic can also be used] squeeze a small amount of the first colour [the least dominant/ background] onto the pallet board. Squeeze the second colour out on top of the first, applying the required amount of ink to suit your design. Repeat this process until all colours have been applied to the pallet board.
Using a pallet knife [or paddle pop stick] cut lines through the pile of ink in both a horizontal and then a vertical direction. DO NOT STIR THE INK, cut through the ink.
Once this has been done, use the pallet knife to scoop up the ink and apply to the design
Select the two colours you wish to use and apply the first colour to the top of your design from the tube [or first mix of colour]
On a pallet board [card or plastic can also be used] apply some of the first colour and add a small amount of your opposite colour. Stir well to create your new colour. Once mixed, apply to the design next to your previous colour.
Your design will slowly graduate from one colour to the other through a series of colour mixes.
Tip: If you are doing this for the first time, write down the ratio used for each mix so as you don't repeat any colours and continue towards your final colour.
Tip: Use plenty of ink as any remaining ink is used for the next mix and will help to keep the colours slowly graduating.