|
|
|
|
| Place mouse over 'Training' menu above to display extra options |
| Page Location: Home > Training > Information Sheets > #05 Imaging ScreenMaster with Print Lamps |
|
|
|
|
| Place mouse over 'Training' menu above to display extra options |
| Page Location: Home > Training > Information Sheets > #05 Imaging ScreenMaster with Print Lamps |
|
|
|||
|
|
|||
|
|
|||
|
|
|||
|
|
Imaging ScreenMaster with Print Lamps
Screen printing screens are created in an instant with Screen Printing, Ceramic & PRINT GOCCO models using Print Lamps.
Artwork can be imaged in a single process [A5 screens], or in multiple processes to create larger screens. After a screen has been imaged it must be mounted to a frame ready for printing.
Raise the lid of the machine and place a piece of card onto the Pad Table.
The card eliminates any effect the grid may have on the design, by causing a patchy result where the artwork is not against the film of the mesh.
Cut your ScreenMaster to size, for the frame and design
Place your artwork onto the Pad Table, face up
Place the piece of ScreenMaster on top of your artwork, film [shiny] side against the artwork, mesh side upwards
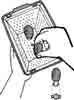 |
5. Place 2 Print Lamps into the Lamp Housing ready for imaging by screwing inwards |
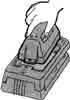  |
6. Insert the Lamp Housing into the machine - disarming the Safety Switch in the process for the Lamp Housing to fit and complete the required electrical circuit. |
Notes on PRINT GOCCO Safety Switch
The Safety Switch only needs to be depressed whilst the Lamp Housing is being inserted into the machine. Once the Lamp Housing is in you can release the Safety Switch.
Disarming the Safety Switch
Cut the mesh out of an old paper printing master, leaving just the cardboard frame, and insert into the Lid of the machine - this will disarm the Safety Switch.
PG-5 models - The switch is cream coloured and located at the base of the Stage Glass on the inside of the Lid. If you can not use a cardboard frame from a Print Master, scissors or a pen will do.
NEHOC Screen Printing Kit - as above
NEHOC Ceramic Printing Kit - as above
PG-11 models - The switch is cream coloured and located on the right of the Stage Glass on the inside of the Lid. If you can not use a cardboard frame from a Print Master, simply hold the switch back with your finger when inserting the Lamp Housing.
PG Arts for Paper - The switch is metal and located behind the Print Master slot inside the Lid. The cardboard printing frame is the best method. With this model you can place a piece of sticky tape across the Switch to hold it back, but use caution not to tape over the metal contact points on the Stage Glass area.
B6 model - The switch is orange coloured and located at the top of the Stage Glass on the inside of the Lid. You can push the trigger back with your finger inside the Stage Glass, as a B6 Print Master would do, whilst inserting the Lamp Housing into the B6 lid.
B5 model - As per PG Arts
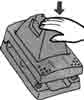
Lower the lid of the machine, ready for imaging.
|
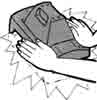
Place the palms of your hand on the two front corners and push down until the machine flashes - HOLD THE UNIT DOWN FOR 4-5 SECONDS or until the lamps stop cracking. This allows the heat to correctly image the design.
Lift the handles back to a resting position and remove the Lamp Housing - CAUTION the Print Lamps will be hot. Place the Lamp Housing face up so excess heat can freely escape - if you have gloves, or tough skin, you can remove the Print Lamps from the Lamp Housing at this stage.
Remove your ScreenMaster and mount to your frame ready for screen printing
Even the smallest machine will make screens 10 times its size!!
If your design is larger then the Stage Glass area then you will need to process your screen in stages.
How it's done
You must start at one end of your design and work your way across the design. Do not image one end then the other and finally the middle.
 Image the top of your design using following the steps
outlined above for A5 designs.
Image the top of your design using following the steps
outlined above for A5 designs.
When the second [or multiple] flash is required for a larger design, reposition the screen in the machine so as the already imaged area of the screen overlaps with the un-imaged area by approx 10mm. NB: This overlapped area will not be damaged by double flashing.
Image the next section of the design.
Repeat as necessary until full design area has been imaged Remember you only need to image the design area - if you put a small A5 design on an A3 screen it will only need 1 'flash'!
Once you have imaged your design onto the piece of RISO ScreenMaster it must be attached to a frame ready for printing.
Important: RISO ScreenMaster is not stretched like traditional silk screen mesh - it already has the film attached and therefore is already pre-tensioned and does not require hard stretching to a frame. Over stretching RISO ScreenMaster will only distort the design and reduce print quality.
 Step
1 - Lay the frame onto a flat surface, tape side up, and remove the
double sided tape from all 4 sides of the frame.
Step
1 - Lay the frame onto a flat surface, tape side up, and remove the
double sided tape from all 4 sides of the frame.
Step 2 - Attach the top edge of the screen to the frame and then stretch across the bottom edge. Don't worry if wrinkles occur at this stage - all you need to do is attach the screen gently to the frame.
 Step
3 - Lift the left edge from the tape and pull a little tighter to
remove any wrinkles that may have occurred. Repeat this process on the right
side.
Step
3 - Lift the left edge from the tape and pull a little tighter to
remove any wrinkles that may have occurred. Repeat this process on the right
side.
Step 4 - If wrinkles remain, lift the top, or bottom, from the tape, slightly stretch to remove the wrinkle and then fasten to the tape.
Repeat the process on any side where a wrinkle exists, until all wrinkles have been removed.
Further details of this process are available in the SP-275 Operation Manual download available from the Download section - More . .
Have you over stretched the screen?
If your plastic frame is buckled/ does not lye flat on the table then your screen is over stretched. Simply lift the edge to release the pressure and re-apply to the tape.
In extreme cases, over stretching your screen will distort your design, however the pre-attached film on the mesh help to eliminate this problem. If your design is distorted, it is best to completely remove the ScreenMaster from the frame and begin the process again, using less pressure to remove any wrinkles.
Printing your design
You are now ready to begin printing your design onto the item of your choice. For details on basic screen printing technique - Click here . .