|
|
|
|
| Place mouse over 'Training' menu above to display extra options |
| Page Location: Home > Training > Information Sheets > #17 Imaging B6 with MG-11 |
|
|
|
|
| Place mouse over 'Training' menu above to display extra options |
| Page Location: Home > Training > Information Sheets > #17 Imaging B6 with MG-11 |
|
|
|||
|
|
|||
|
|
|||
|
|
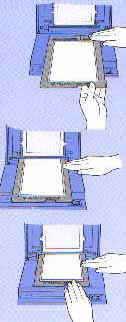
Imaging B6 Print Masters with MG-11
Firstly, you must have your artwork prepared ready for imaging - see Artwork Types & Preparation if unsure - this being a carbon original free of moisture.
 B6
Print Masters are imaged in 3 separate flashes. Alignment is through use of
the red alignment dots on the left of the Print Master - these being
aligned against the arrows on the MG-11 Machine.
B6
Print Masters are imaged in 3 separate flashes. Alignment is through use of
the red alignment dots on the left of the Print Master - these being
aligned against the arrows on the MG-11 Machine.
Align the top red dot against the top arrow - if your design is within the Stage Glass area otherwise use the middle set of arrows.
Flash the design and move through the machine aligning the dots and the arrows according to your design size.
Continue until all the area is finished.
Overlapping the design for two flashes will not adversely effect your Master
Start from one end and work your way down the design - DO NOT image each end and then attempt the middle section.
It's that simple and easy to make a Print Master - Just ensure that your artwork is prepared and free of moisture for the best result every time.
Video demonstrations of this process on the new NEHOC Training CD.