|
|
|
|
| Place mouse over 'Training' menu above to display extra options |
| Page Location: Home > Training > Information Sheets > #29 Decal Printing |
|
|
|
|
| Place mouse over 'Training' menu above to display extra options |
| Page Location: Home > Training > Information Sheets > #29 Decal Printing |
|
|
|||
|
|
|||
|
|
Printing Decals
Create your own decals - single or multiple colour - using a simple 4 step process that saves time and materials compared to traditional methods!
Making your own decals is a simple 4 step process involves the following basic steps:
Using a RISO system to transfer your design onto a screen printing screen
Screen printing decal Ink onto blank decal paper
Covering the printed decal paper with a clear cover coat to seal the decal
Applying the decal to your item [+ fire if onto ceramics]
Materials required
The materials you will require for this process can vary depending upon the size, quantity and the number of different colours.
You will need a RISO system to image your screens
RISO ScreenMaster mesh - PRINT GOCCO Print Masters can also be used [attached to a small plastic frame for support]. 135Mesh is recommended over the standard 70Mesh grade however 135Mesh is best imaged with a SP-275 ScreenFax.
Decal medium and oxide [colour as required] - mix together to form decal ink
Plastic Frame [small or large] and squeegee for printing
Tile Jig [or similar] for printing the decals - essential for multiple colours
Covercoat [oil based] & brush or traditional silk screen for applying covercoat
Spirits to clean the covercoat off the screen/ brush
As the decal paper is not very absorbent it is best to use a finer grade of mesh, such as ScreenMaster 135Mesh or 200Mesh which is found in PRINT GOCCO Print Masters.
IMPORTANT
135Mesh can not be imaged with PRINT GOCCO Print Lamps, so if you have a PRINT GOCCO imaging system, use the standard B6 or B5 Print Masters.
 With your screen
imaged, mount the loose ScreenMaster to a frame. If you are using a PRINT
GOCCO Print Master [with cardboard frame] then attach to a plastic frame for
added support and you are ready for printing.
With your screen
imaged, mount the loose ScreenMaster to a frame. If you are using a PRINT
GOCCO Print Master [with cardboard frame] then attach to a plastic frame for
added support and you are ready for printing.
The benefit of the RISO ScreenMaster pretensioned screens enables you to take your design on and off a frame [without any distortion] so you can re-use your frame for another design - saving material costs!
For details on framing screens - Click here . .
|
|
|
Use the Tile Jig [above] and print using the other [flat] side when decal printing |
Screen printing your decal
This process is best performed using the flat side of the Tile Jig [S-361] which considerably simplifies printing.
If you intend to print multiple colours then a Tile Jig [or similar] is essential for the registration of all the colours.
HINT: Use a little Table Adhesive [HTAH] on the board of the jig to help hold the decal paper flat and still during printing - this will avoid blurs and miss-prints.
 The actual printing process is the same as for all other screen printing
with the squeegee held at an angle of about 65 degrees and lightly pulled
across the screen. You do not need to push the ink through the screen, the
squeegee will do all the work for you.
The actual printing process is the same as for all other screen printing
with the squeegee held at an angle of about 65 degrees and lightly pulled
across the screen. You do not need to push the ink through the screen, the
squeegee will do all the work for you.
For information on screen printing technique - Click here . .
Special decal printing inks
Decal inks are an oil based medium, so your screen can not be cleaned/ reused once you have finished printing.
Combine the clear medium with your oxide to form the finished ink - stir very well before use each application.
Ink can be stored for later use.
Printing multiple colours
You must separate the design into the different colours and make a separate screen for each colour. Details of this process are available for hand and computer separations on Information Sheet 13a & 13b.
You need to make a different screen for each colour you wish to print - unless you intend to print the same design in a different colour, in which case clean down the screen and squeegee and then print in the second colour.
Complete details of registering and printing multi-coloured designs is available on Information Sheet #30. To view details now - Click here . .
Colour separating a design by hand - Click here . .
Creating colour separations using a computer - Click here . .
Applying the covercoat
The decal ink MUST be fully dry before applying the covercoat. This takes about 4 hours, but can be force dried with a hair drier [or similar]. Use caution not to overheat/ damage the decal paper.
If you are not in a hurry then for best results leave the decal ink overnight to dry.
The clear covercoat MUST be applied over the design to seal the decal.
Apply the covercoat by brushing over the decal area, ensuring you completely cover the design area - plus at least 10mm outside the design area. Any brush marks will burn away when fired.
A new traditional silk screen printing screen can also be used [NOT RISO ScreenMaster] - as this provides an even layer over the entire area of the decal paper [or to the size of your screen]. The traditional silk screen can also be cleaned using spirits as the covercoat is oil based and requires clean up with spirits.
Once the covercoat is printed over the decal, leave to dry. We suggest leaving for 24 hours but this is dependant upon the covercoat used and the temperature, etc.
If the covercoat is not dry before submersing into the water then your ink may bleed.
Applying the decal
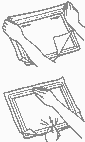
Cut out the decal to size and then apply as per normal by soaking in a bowl of water until the decal separates from the paper.
Remove the decal from the water and apply to your item. Remove all air bubbles [a squeegee can be used for this process]. Allow to dry - normally 10 minutes.
Firing the decal onto ceramics
If you are placing the decal onto the item is to be fired, the temperature you require is of course dependant upon the ink you have used.
THERE IS NO ADDITIONAL GLAZE REQUIRED OVER THE DECAL PRIOR TO FIRING
During the firing process the decal paper will burn away, leaving the decal ink on the top of the glazed surface.
Storage
RISO Printing Supplies as per individual storage instructions
Decal paper in a cool, dry area free of moisture
Decal ink, Oxide & Overprint lacquer in packaged containers as shipped - in a cool dry place out of direct sunlight
Cleaning
RISO supplies as per Operation Manual
Covercoat is oil based and will require spirit clean-up
Supplies of Decal Paper & Covercoat
Decal Paper, & Covercoat Lacquer area available your local pottery supplies warehouse or: