|
|
|
|
| Place mouse over 'Training' menu above to display extra options |
| Page Location: Home > Training > Information Sheets > #34 Screen printing with opaque fabric inks |
|
|
|
|
| Place mouse over 'Training' menu above to display extra options |
| Page Location: Home > Training > Information Sheets > #34 Screen printing with opaque fabric inks |
|
|
|||
|
|||
|
|
Screen Printing with Opaque Inks
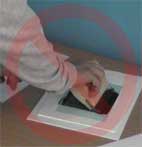
When the screen is NOT raised you will actually pull a layer of ink back off the item when you lift your screen - this is why the item may appear patchy [as whilst your print was perfect, the wetness of the ink and heavy pigment load sticks to the strands of the mesh].
Raising the screen and 'snapping' back to a height above the item, the screen does not remain in contact with the item, so when it is lifted after printing the mesh is already away from the item and does not stick to the design [leaving all the ink on your item].
View details of off contact printing in a separate window - click here . .
A screen printing jig, or jig hinges, makes 'off contact' printing faster, easiest and most importantly accurate as you simply insert a few plastic height adjusters [S-9112] under the frame. The arm of the jig will hold the screen in perfect registration for each print.
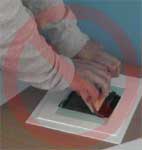
By keeping the squeegee at a higher angle of approx 70 degrees, you will use the sharp edge of the squeegee to print the item & ensure the ink is pushed through the strands of mesh in your screen.
You will receive a clearer and more detailed image by printing 2 times rather than 1 heavy print. The denser pigments in the ink can not all pass through the mesh in 1 pass so by performing 2 passes you put down a set of 2 clearer prints that stack on top each other and give you a clear solid print.
You should hear the rippling noise of the blade passing over the mesh strands as you print.
 |
|
 |
|
 |
This point is used in conjunction with both the previous point of squeegee angle and the next point of keeping the screen clean of ink after printing - it is adjusted to suite your printing technique, the height of the frame above the item and thickness of the ink you are using. |
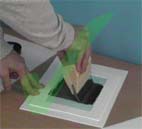
| Remember to look at your screen not the print |
After printing you will naturally look at the print, however more importantly look at your screen after printing, as it’s the health of the screen that is more important to your overall printing.
A clean and healthy screen will continue to give you sharp quality prints.
You will notice problems with your screen before anything happens to the prints on your garments, so acting before things happen will save you troubles, miss prints and valuable time.
Most prints using opaque inks will require 2-3 passes of the squeegee for complete coverage.
Remember that 2-3 passes using a consistent and even pressure - not heavy - will produce a clearer, more solid image than 1 heavy pass. Fabric can only absorb a certain amount of ink in 1 pass, so multiple passes with less ink will produce a clearer result.
High synthetic materials, such as polyester, may even requiring a drying between passes. Print the first layer then lift the screen and touch dry, then lower and print again. Note this process only recommended when using a screen printing jig.
A commonly forgotten aspect part of printing opaque inks is the very important part of holding your item flat when printing - this is achieved by using Table Adhesive under your item when printing.
If you do not use Table Adhesive, although you have raised the height of your screen, the item will lift up and stick to the back of the screen eliminating all the other work you have done.
Table adhesive is an inexpensive and critical part of the process that should not be forgotten.
Table adhesive is applied to the board under your print area to hold your item still whilst printing - avoiding movement, smudges, misprints, blurring, etc.
Simply apply 1 drop every 7-10cm and spread evenly over your printing board and allow to dry.