|
|
|
|
| Place mouse over 'Training' menu above to display extra options |
| Page Location: Home > Training > Information Sheets > #35 S-868 Operation Guide |
|
|
|
|
| Place mouse over 'Training' menu above to display extra options |
| Page Location: Home > Training > Information Sheets > #35 S-868 Operation Guide |
|
|
|||
|
|||
|
|
NEHOC Screen Printing Kit Operation Guide
The following is not the full S-868 Operation Manual, this is an operation guide to the set-up and use of the S-868 kit. To view the full Operation Manual click here . .
Machine Set-Up
Before you can use your machine there are 3 simple steps to follow:
1. Open the Lid of the machine and remove the Protective Card from the Stage
Glass. Peel the protective plastic off the Pad Table [discard] and place the
Protective Card over the adhesive Pad. This is required to provide a smooth flat
imaging surface.
 2. Insert the batteries into the Lid of the machine by opening the Lid to expose
the Battery Cover on the inside - as pictured - placing positive ends to the
left as indicated by the drawing inside the battery cover.
2. Insert the batteries into the Lid of the machine by opening the Lid to expose
the Battery Cover on the inside - as pictured - placing positive ends to the
left as indicated by the drawing inside the battery cover.
3. READ the full instructions contained on the NEHOC Screen Printing Kit
Operation Manual [view
now] or follow this
guide. Improper use may cause damage to the machine not covered by warranty.
|
NEHOC Screen Printing Kit Operation Manual |
|
You can create A4, A3 and larger screens using the machine by processing screens in stages. The machine images an area 100 x 150mm in one process, so all designs larger than this require multiple processes - all easily & quickly done:
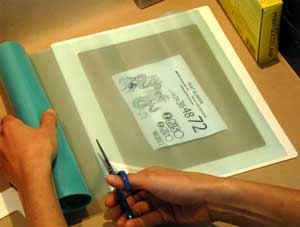 |
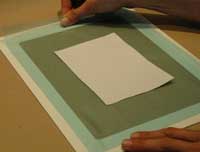
Step 1 Select the frame size you require for your design, ensuring there is a 25mm gap at the ends and a 10mm on the sides. Place the mesh over the back of the frame and cut to size so as the mesh covers the double sided tape. |
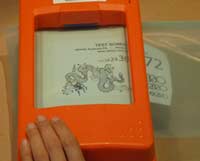 |
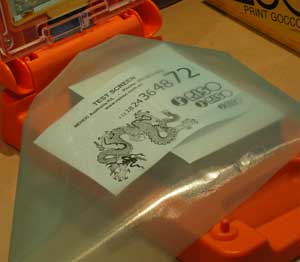
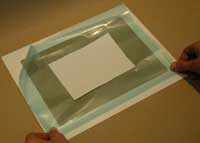
Step 2 Place the artwork over the card on the pad table facing upwards. Place the ScreenMaster mesh over the artwork with the film/ smooth side down. Lower the lid to check the design is within the stage area [including the frosted edges of the stage]. Note: This example shows a 2 stage [A4 & larger] imaging process, however if the design fits into the stage area then only 1 imaging process is required. |
 |
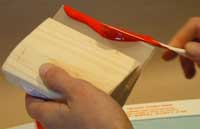
Step 3 Insert 2 Print Lamps into the Lamp Housing by screwing clockwise as pictued left. HINT: Rub the base of each Lamp onto a piece of scrap paper to create a clean contact point. |
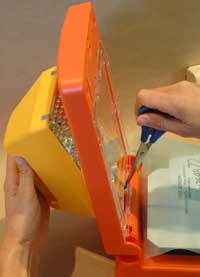 |
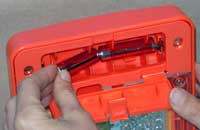
Step 4 Disarm the Safety Switch located at the base of the Stage Glass - push down with a pair of scissors [as pictured right] or the palette knife supplied in kit. If not disarmed the machine will not flash the Print Lamps. With the switch depressed insert the base of the Lamp Housing and then push the top of the Lamp Housing into the Lid. Ensure the Lamp Housing is firmly inserted and the contact points are not visible when the lid is lowered. |
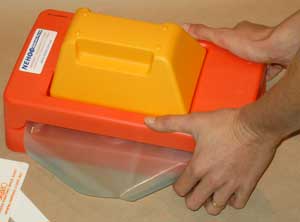 |
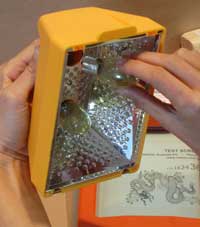
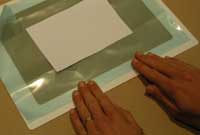
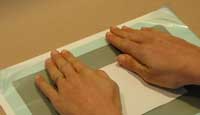
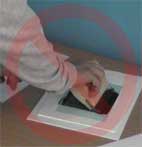
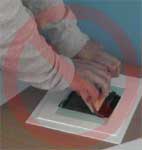
Step 5 You will now have the artwork and mesh inserted into the machine, the Lamps in the Lamp Housing & inserted into the lid. Lower the lid and place your hands on the front edge of the machine - as pictured right - press down hard to ‘flash’ the Lamps. Hold down for 2 seconds, then release and lift the lid. |
| If
your design was imaged in 1 process, proceed to the next section ‘Mounting to a
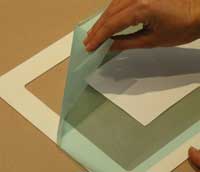
Frame’. Designs that require further imaging please continue below. IMPORTANT: Do NOT pull the artwork off the screen, it is required to remain attached in order to image the next section. You can clearly see which part of the artwork/ screen is imaged, and which part requires further imaging. |
|
 |
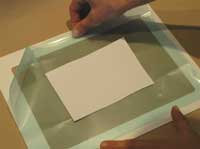
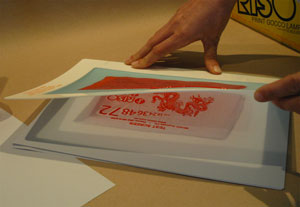
Step 6 Place the artwork [with screen attached] back into the machine and move through the machine to image the next section. You MUST overlap part of the area that has already been imaged - double imaging this part of the screen will NOT damage the mesh. If you do not overlap the image will appear with a gap in the design. |
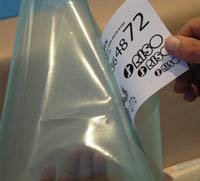 |
Step 7 Repeat steps 3 to 5 imaging the remainder of the design. This process can be repeated as many times as required to image the remainder of the design [some A3 designs may require up to 8 images]. When complete, you can peel back part of the artwork from the mesh to view the design has imaged properly - once all the design is imaged you may remove the artwork if you prefer before . . |
 |
Step 1 |
 |
 |
Step 2 |
 |
 |
Step 3 |
 |
You can not print with the
screen if wrinkles are present.
|
We recommend you print about 20 times on scrap paper to get the
feel of the squeegee, pressure required, lifting the frame and reapplying ink.
 |
Start by stirring the ink & dipping the palette knife into the pot - raise and apply the ink to the blade of the squeegee, or directly onto the screen above the design [onto squeegee will use less ink]. |
Avoid the 2 main problems that lead to smudges/ bleeding & faint/ light prints:
 |
|
 |
|
 |
Place the squeegee onto the screen at the top of the design and pull through towards you [keep your wrist & elbow still] with even pressure. |
 |
Lift the frame from the design in a hinge like motion, using one hand on the edge of the frame and lifting from the other side. |
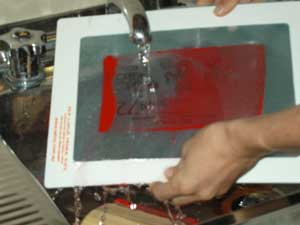 Cleaning
All NEHOC fabric inks are 100% waterbased with clean-up in cold water [not hot, as mesh is thermally reactive].
X Do NOT scrub smooth/ film side [rough/ ink side only] of screen. Do not hi-pressure wash.
 The
complete NEHOC Screen Printing Kit Operation Manual covers
additional topics such as:
The
complete NEHOC Screen Printing Kit Operation Manual covers
additional topics such as: