|
|
|
|
| Place mouse over 'Training' menu above to display extra options |
| Page Location: Home > Training > Information Sheets > #25 Screen Printing Technique |
|
|
|
|
| Place mouse over 'Training' menu above to display extra options |
| Page Location: Home > Training > Information Sheets > #25 Screen Printing Technique |
|
|
|||
|
|
![]() Screen Printing Technique
Screen Printing Technique
NEHOC's easy to use equipment and the provision of professional squeegees and inks have changed two basic elements of screen printing.
 |
|
 |
|
It’s NOT the pressure applied to the squeegee that pushes the ink
through the screen and onto the item below . . . it’s actually the sharp edge of
the squeegee blade that pulls a fine layer of ink through the screen mesh, which
is designed to regulate the amount of ink that passes. So excess pressure just
blurs your design and reduces quality.
If you have never screen printed before then you will normally receive a better
print than a person who has using old techniques, as they must remove old habits
of excessive pressure which was required using the outdated equipment and inks.
You must use pressure on the squeegee to keep even pressure along that blade so
one side does not print more than the other, however you can screen print with 2
fingers holding the squeegee blade - let the squeegee & ink do the work for you.
Basic Screen Printing Technique
 |
|
 |
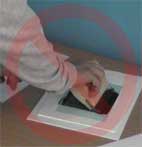
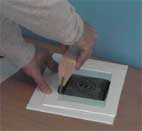
3. With sufficient ink on the blade,
about 7-10mm thick, place the squeegee onto the edge of the screen, then lower
the blade and rock forward & back 3 times to transfer this ink onto the screen
and then bring the angle back up ready to print |
  |
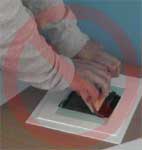
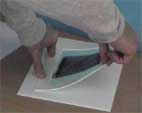
4. Pull the squeegee across the screen at an angle of approx. 70 degrees from one side to the other, when complete raise the squeegee angle back to vertical to ‘pick up’ the ink and remove from the squeegee from the screen |
 |
|
Points to Note
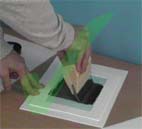
![]() Your squeegee should be at
approx. 70 degrees and move freely across the screen
Your squeegee should be at
approx. 70 degrees and move freely across the screen
![]() If too much ink is flowing off
the outside edges and the print is blurred or heavy, then you are pressing too
hard
If too much ink is flowing off
the outside edges and the print is blurred or heavy, then you are pressing too
hard
![]() Once you commence printing you
will quickly determine the correct level of pressure and squeegee angle that
suits - the prints will tell you what you are doing wrong
Once you commence printing you
will quickly determine the correct level of pressure and squeegee angle that
suits - the prints will tell you what you are doing wrong
|
|
![]() Prints too light, not a clear
image = pressure too light, squeegee angle too high or not enough ink on the
squeegee
Prints too light, not a clear
image = pressure too light, squeegee angle too high or not enough ink on the
squeegee
Heat Setting Fabric Inks
Fabric screen printing ink requires heat setting in order to cure/set the ink to the fabric. The following is a guide to the heat setting process and explains why prints should be heat set for 2 minutes to ensure permanent bonding.
![]() 150F
[66°C] Water begins to leave the ink
150F
[66°C] Water begins to leave the ink
![]() 200F
[94°C] Binder reaches lowest viscosity and maximum surface contact is made with the fabric
200F
[94°C] Binder reaches lowest viscosity and maximum surface contact is made with the fabric
![]() 220F
[105°C] Water begins to leave the ink rapidly
220F
[105°C] Water begins to leave the ink rapidly
![]() 270F
[133°C] Fifty percent of the water is gone and the binder and pigment start to cure
270F
[133°C] Fifty percent of the water is gone and the binder and pigment start to cure
![]() 300F
[150°C] Most of the water is gone and the binder-pigment combination is partially cured
300F
[150°C] Most of the water is gone and the binder-pigment combination is partially cured
![]() 300F
[150°C] [for 30 seconds to a minute] Binder and pigment is cured
300F
[150°C] [for 30 seconds to a minute] Binder and pigment is cured
[The above should be used as a guide only, and may vary slightly between ink
types. Times printed on sides of containers are for wet prints. Curing of dry
prints still takes at least 2 minutes as ink has to get to temperature first.]
NEHOC Aqua Inks [plastic/ metals] and Air Cure Ink DO NOT require heat setting - each ink will air dry [can be force dried with a hair drier] and will set in due course - see ink for details.
Cleaning & Storing Screens
Always use water soluble inks with ScreenMaster, this makes cleaning easy as you can always clean under cold running water. The ink will quickly break down leaving you with a perfectly clean screen.
Always store RISO ScreenMaster screens away from any heat source [heaters, lights, etc.], in a cool/ dry place.