|
|
|
|
| Place mouse over 'Products > Ceramics' menu above to display extra options |
| Page Location: Home > Ceramics > Direct screen printing onto ceramics |
|
|
|
|
| Place mouse over 'Products > Ceramics' menu above to display extra options |
| Page Location: Home > Ceramics > Direct screen printing onto ceramics |
|
|
|||
|
|
|||
|
|
|||
|
|
|||
|
|
|||
|
|
|||
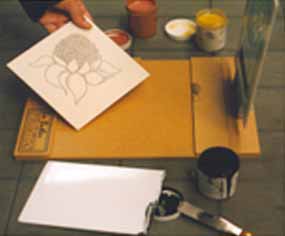
Printing directly onto ceramics i.e. Tiles
Once you have created your screen printing screen in the PRINT GOCCO you can screen print directly onto your materials.
Direct Screen Printing Technique
Create your Screen Printing Screen - Information on this process can be found in the Training section or to see details now - Click here . .
Once your screen is ready, you can begin to print directly onto your materials. The technique is the same as for normal fabric printing, however if you have never screen printed before - do not panic - here is a simple guide to have you printing in minutes.
A simple jig should be used for all tile printing, such as the Ceramic Tile Jig [S-361] as this will provide a fast, easy, clean and well registered print.
A Tile Jig will hold your Screen Printing Screen and place it above your tile in the same position each time - ensuring each print is placed where you want it!
For one-off prints you can simple place the screen onto the item and perform a print, however once you perform the initial print the colour of the ink will limit your ability to register additional prints by hand.
 |
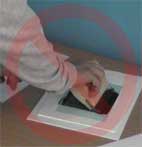
1. Once your screen is made, place the screen over some paper ready for a test print |
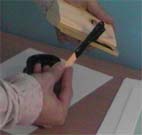
3. Place sufficient ink onto the blade with an ink knife – about double your normal toothpaste amount [6 to 7mm thick]
 |
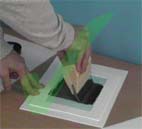
4. Lower the squeegee angle to transfer the ink onto the screen and then bring the angle back up ready to print |
 |
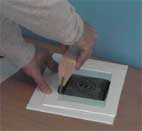
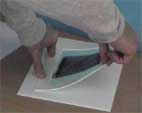
5. Pull the squeegee across the screen at an angle of approx. 70 degrees |
 |
6. Raise the squeegee angle up to 90 degrees to ‘pick up’ the ink and remove from the screen |
 |
Points to Note
![]() Your squeegee should be at approx. 70 degrees and move freely across the screen
Your squeegee should be at approx. 70 degrees and move freely across the screen
![]() If too much ink is flowing off the outside edges and the print is blurred or heavy, then you are pressing too hard
If too much ink is flowing off the outside edges and the print is blurred or heavy, then you are pressing too hard
![]() Once you commence printing you will quickly determine the correct level of pressure and squeegee angle that suits - the prints will tell you what you are doing wrong
Once you commence printing you will quickly determine the correct level of pressure and squeegee angle that suits - the prints will tell you what you are doing wrong
 |
|