|
|
|
|
| Place mouse over 'Training' menu above to display extra options |
| Page Location: Home > Training > Information Sheets > #07 Ceramic Printing & Decoration |
|
|
|
|
| Place mouse over 'Training' menu above to display extra options |
| Page Location: Home > Training > Information Sheets > #07 Ceramic Printing & Decoration |
|
|
|||
|
|
Ceramic Printing and Decoration
Quick and easy design transfer onto ceramics - ScreenMaster enables a design to be applied to green ware, bisque ware & glazed surfaces.
When you need to put the same design onto multiple items, forget tracing, drawing, brushing and painting the design again and again. Print them perfectly using:
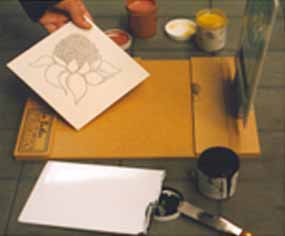
a] Transfer Printing - Laying a ScreenMaster screen printing screen over Transfer Paper and screen printing the KERA Underglaze Printing Ink through the screen onto the paper below. This wet design is then ‘transferred’ from the Transfer Paper onto the ceramic piece [flat or curved].
b] Direct Screen Printing - Laying a ScreenMaster screen printing screen directly on top of the item to be printed and the special KERA Printing Ink [Underglaze or Onglaze] is printed through the screen onto the item below.
The unique ink development by Ceramic Glazes of Australia and the simplicity of the NEHOC ceramic printing system, enable anyone to achieve professional results without the professional costs, or any experience in screen printing.
| Transfer Printing onto Ceramics |
Any design may be used for the transfer process - simply image your screen and attach to your frame ready for printing.
Printing
Using a squeegee and KERA Underglaze Printing Ink, the design is screen printed onto the transfer paper.
 Multiple copies of the design may be printed at the same time if more than one copy of the design is to be applied to the same, or multiple pieces of ceramic bisque ware.
Applying the design
Using a damp cloth, moisten the back of the transfer paper whilst gently rubbing over the design area - This will assist in the release of the underglaze from the Transfer Paper to the bisque ware.

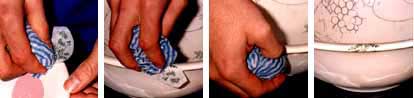
Your design is now complete and ready for firing.
| Direct Printing |
A simple jig should be used for all direct printing, such as the Ceramic Tile Jig [S-361] as this will provide a fast, easy, clean and well registered print.
 A Tile Jig will hold your Screen Printing Screen and place it above your item in the same position each time - ensuring each print is placed where you want it!
For one-off prints you can simple place the screen onto the item and perform a print, however once you perform the initial print the colour of the ink will limit your ability to register additional prints by hand.
The printing process for Direct Screen printing is the same as for fabric printing and other normal screen printing applications. For details on screen printing technique - Click here . .
| Multi-Layer & 3D effects |
Using the RISO screen printing system it is possible to achieve multi-layered & 3D effects by simply overlaying design/s on top of each other. Just ensure the previous layer has had time to dry before applying the next.
| Reverse Printing |
Occasionally the need may arise where a reverse copy of a printed design is required to complete a specific design. Due to the gentle nature of Transfer Printing Ink, the underside/ 'shiny' side may be used. This simply involves turning the pre-imaged screen over and printing through the 'wrong' side.
NB: This process should only be used sparingly as repeated use may adversely effect the life of the screen.