|
|
|
|
| Place mouse over 'Training' menu above to display extra options |
| Page Location: Home > Training > Product Sheets > S-138 PG 65 Photo Dot Screens |
|
|
|||
|
|
|||
|
|||
|
|
|||
|
|
|
|
| Place mouse over 'Training' menu above to display extra options |
| Page Location: Home > Training > Product Sheets > S-138 PG 65 Photo Dot Screens |
|
|
|||
|
|
|||
|
|||
|
|
|||
 How
to use PG 65 Photo Dot Screens
How
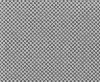
to use PG 65 Photo Dot ScreensHow does a Dot Screen work?
By filtering the content of a design through a printed film with an array of tiny dots, a dot screen can be used to reduce the visible area of the design without distorting the overall shape/ view of the design.
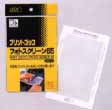
What is a Photo Dot Screen?
 Most Dot
Screens use larger dots to break down the solid areas of the design, however a
Photo Dot Screen uses small dots to keep more details in the design.
Most Dot
Screens use larger dots to break down the solid areas of the design, however a
Photo Dot Screen uses small dots to keep more details in the design.
These dots 'filter' the design and provide a much needed screen over the design for printing.
The effect is the same as that used for printing in newspapers and also process colour printing [CMYK]. The flow of ink is essentially limited by the design, not the equipment [which is much harder to set up and maintain at correct levels - near impossible for manual screen printing.]
Example: The ink flow in PRINT GOCCO is determined by the pressure and length of the print time - instead of finding the correct pressure and time for each design [which would take about 5 minutes, but would produce about a 25% miss prints], we change the level of ink flowing into the design - making printing the same as for all other designs.
Let's leave this here before it gets too technical, the point to remember is the Photo Dot Screen works for all photographs!
When should I use a Photo Dot Screen?
With ALL photographs. The Photo Dot Screen provides your artwork with depth and grey scales.
Without the Photo Dot Screen, your print will appear dark and you will not be able to tell the difference between foreground and background.
If you have access to a computer, professional laser printer [not ink jet] and professional design program [i.e. Adobe PhotoShop] then you can also manipulate the print by overlaying a 'screen' on the design when printing. This process is not supported on these pages - pleas refer to your programs 'Help files' for further details.
What photographs work best?
As you will generally be printing in single colour, a photograph that is also single colour is the best place to start - this being a black/ white photo.
If you photo is colour - don't worry it will still work out fine, but set the contrast on the photocopier one place higher to lighten the design slightly.
 How
do I use a Photo Dot Screen?
How
do I use a Photo Dot Screen?
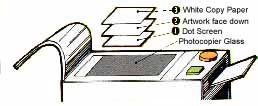
 A
dot screen is laid over the stage glass of the photocopier [or computer
scanner], UNDER the artwork/ design.
A
dot screen is laid over the stage glass of the photocopier [or computer
scanner], UNDER the artwork/ design.
Place a piece of clean white paper over the back of the design to mask of the outside areas.
Lower the lid of the photocopier and start your copy.
NOTE: When making a photocopy, set the copier to the lightest setting BEFORE the design begins to fade/ distort. Even the lightest setting of the photocopier STILL has too much carbon to create a screen [hence why the Blue Filter or Artwork Clean-Up process is used].
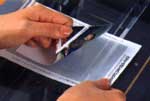
When the copy is made, the dot screen is then 'laid' over the design and the copy you receive is the fusion of the two elements.
Prepare your artwork properly and then image your screen.