|
|
|
|
| Place mouse over 'Training' menu above to display extra options |
| Page Location: Home > Training > Information Sheets > #01 Artwork Types and Preparation |
|
|
|
|
| Place mouse over 'Training' menu above to display extra options |
| Page Location: Home > Training > Information Sheets > #01 Artwork Types and Preparation |
|
|
|||
|
|
|||
|
|
|||
|
|
|||
|
|||
|
|
|||
Artwork Types and Preparation
Tip for best results
Your artwork should be converted to straight black & white where possible [unless you require grey tones] as the system does not use colour to image the screen - colour is added by you during the printing process.
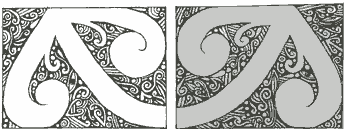
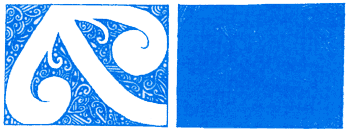
Here's a graphic example of how a design with a grey background prints compared to the other half that has been cleaned of the grey background and had the lines changed to black.
| Cleaned copy on the left - Original on the right |
 |
| Reproduction of cleaned copy on the left - original on the right |
 |
Hand drawn with RISO Artwork Pen
Off set printed with carbon ink - RISO design books
Photocopy
Laser Print from a computer
1/ Hand Drawn Artwork Using Carbon Based Artwork Pens
Design & draw the original artwork. B5 drawing paper provides an excellent tool for hand drawn artwork as the outer dimensions available on both B6 and B5 are clearly shown and the blue grid will not reproduce when imaged.
Dry the Artwork with a hair drier to remove ALL THE MOISTURE from the design - This is important to ensure a proper image will result.
Place into the PRINT GOCCO face up, insert a Print Master and lower the lid - ensure artwork is within the Print Master frame..
Place two Print Lamps into the Lamp Housing and insert Lamp Housing into the PRINT GOCCO.
Flash the PRINT GOCCO imaging the screen,remove Lamp Housing and place face up for excess heat to escape.
Remove Print Master and slowly peel off original artwork, starting from one corner.
The Print Master is now made, simply ink up in desired colours, replace into machine and begin printing.
| Here's a quick list of other pen's that contain carbon and can be used to make an original: |
| Black Sharpie, Pentel Color Pen, Tombow Brush Pen, Itoya Fine Point [non permanent], Pigma Micron, Pitt Pen, Zig Calligraphy, Staedtler Pigment Liner, Rapidograph Ultradraw, Stabilo [all], Ritmo Charcoal, China Marker, Staedtler 2b pencil, Sanford Uni-Ball, Black Crayon - If you know another, please tell us . . |
2/ Off Set Printed Artwork
Off Set artwork is imaged in the same procedure as hand drawn originals, explained above. Ensure the design has been dried and of course free of dust/ marks.
Select design required, place face down onto the glass of the photocopier. Lighten contrast setting to above normal - The lighter the copy the less background 'spots' will be reproduced. The best copy is the lightest copy available but without going to the extend that part of the design begins to fade.
Place into the PRINT GOCCO face up, insert a Print Master and lower the lid - ensure artwork is within the Print Master frame.
As per points 3-7 in section 1 above.
4/ Laser Prints from a Computer
The carbon content and concentration from a laser printer is the greatest of all forms of artwork - this can lead to the problem of excess carbon blocking the screen from over imaging (too much carbon in a small area causes the thermal film to not only melt but bind to the strands of the screen mesh).
For most designs where type face is above 14 point and/or solid designs are being used, it is suggested that the Artwork Clean Up procedure be performed first to remove moisture, heat set the carbon and remove excess deposits of carbon on the design.
If the artwork is simple text, then it can be imaged directly after being printed - DO NOT ALLOW IT TO SIT AROUND OR IT WILL ABSORB MOISTURE AND ASSOCIATED PROBLEMS MAY ARISE.
NB: Using Laser printed artwork still requires a blue filter - unless the Artwork Clean Up procedure has been performed- The process may also be slightly trial & error to suit your individual laser printer as the carbon settings from each make & model vary too greatly for NEHOC to provide definitive guides.
If unsure, USE THE ARTWORK CLEAN UP PROCEDURE, It will provide you a great result every time!
Ink Jet prints are not carbon based, but rather a mixture of alcohol/ pigments/ water and are unsuitable for use with RISO screens.
To use an inkjet print simply take a photocopy of the design and use the photocopy.
Artwork Preparation Techniques
|
Customer Testimonial Posted to GOCCO-printers 17/7/03 |
|
My name is Kirsten, and I'm a freelance
designer and owner of a wedding invitation business in Rhode Island. I got
a GOCCO so that I could do thermography on some of my invitation designs,
and ended up liking it so much that I now use it for all the invitations!
It took me a little while to figure out how to make prints that were good
enough to offer for sale, but now I can make perfect prints almost every
time. The GOCCO is a great little |
The most common artwork problem is moisture in the paper, which leads to blockages in the Print Master once imaged. (This can best be noticed by the' hollow line' effect)
Using the Artwork Clean Up Procedure, you will eliminate the moisture in the paper, set the carbon onto the paper & even out the carbon level on your design.
Two simple techniques can be used in preparing artwork -
Artwork Clean Up Procedure - Eliminates many problems associated with imaging screens
Dot Screens - For photographs and alters the carbon content of the design
For this procedure you will require an iron SET TO PERMANENT PRESS - STEAM OFF, Clean Up Paper and scrap paper/work bench unaffected by heat.
Set up your PRINT GOCCO ready for imaging before you begin.
Tear off a piece of clean up paper sufficient to cover the design area
Place the artwork face up on top of several sheets of paper or a surface that will not be effected by heat.
Lay the clean up paper on top of the artwork and begin.
Iron the paper onto the design, moving the iron from one side to the other - Taking no more than 2 seconds to pass over the design.
Repeat this process a further 3 times (4 passes in total) before lifting artwork and slowly peeling off the clean up paper. DO NOT HEAT FOR LONGER THAN 3 SECONDS OR HAVE IRON STILL AT ANY STAGE
On a FRESH piece of clean up paper repeat steps 5 and 6.
On a third piece repeat steps 5 and 6. By this stage there should be a clear carbon image transferred onto the clean up paper - This is normal, if this is not occurring see 'points to note' below
On a fourth and final piece repeat steps 5 and 6. After this your artwork will be warm and paper noticeable crisp - YOUR READY TO IMAGE THE DESIGN.
Points to note:
If the paper is beginning to stick to the design/ lift the carbon then shorten the time of the pass - the paper is being fused to the carbon due to excessive heat.
If the clean up paper begins to burn/ brown or have similar symptom to above, decrease the setting of the iron
The third piece of paper is generally where most of the excess carbon lifts off, however if your printer is heavy in carbon the 4th piece may also be very heavy. If this occurs perform the process on a fifth piece of artwork clean up paper.
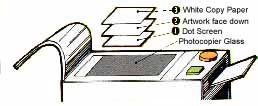
A Dot Screen is essential for re-producing photographs and for use where large solid areas/ type fonts are used in a design.
A dot screen breaks is a sheet of plastic/ film with a white dot pattern screen printed onto it. The screen is laid onto the Glass of the Photocopier before you place the artwork into the photocopier.
Many new photocopiers now have a dot screen option built in, eliminating the need to overlay a manual screen under the artwork.
Using a dot screen may eliminates the need to perform the Artwork Clean Up Procedure as the carbon content is correct and the copy free of moisture as it has just come from the machine.
For full details on using Photo Dot Screens - Click here . .
Summary
Artwork types & preparation can be a confusing subject if you are unsure of how the system works or what is best for you, etc.
 Whenever
in any doubt, or your artwork has been lying about for more than 3 minutes - dry
with a hair drier for approx. 30 seconds at the minimum.
Whenever
in any doubt, or your artwork has been lying about for more than 3 minutes - dry
with a hair drier for approx. 30 seconds at the minimum.
Please don't hesitate to contact NEHOC and explain your position - We'll let you know quickly what your options are, and what system will work best for you.