|
|
|
|
| Place mouse over 'Training' menu above to display extra options |
| Page Location: Home > Training > Product Sheets > S-245 Ink Cones |
|
|
|||
|
|
|||
|
|||
|
|
|||
|
|
|
|
| Place mouse over 'Training' menu above to display extra options |
| Page Location: Home > Training > Product Sheets > S-245 Ink Cones |
|
|
|||
|
|
|||
|
|||
|
|
|||
How to use Ink Cones
![Ink Cones [S-245]](../../../products/printgocco/supplies/s245.jpg)
Simple and easy to use, Ink Cones allow the easy [and mess free] application of ink, normally mixed colours, to PRINT GOCCO Print Masters.
|
|
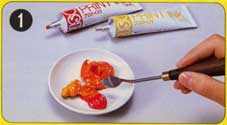
Mix your PRINT GOCCO HM Inks to the required colour in a bowl [pictured], or an Ink Mixing Plate [S-9111]. |
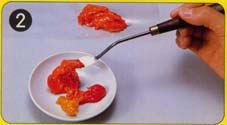 |
Once the desired colour has been mixed, use a soft edge knife or Ink Palette knife [S-024] to place the ink into the Ink cone - as far down the cone as possible towards the nib end. Leave a small air pocket at the end. |
 |
Lay the Ink Cone on a flat surface and wrap around in a circle as pictured. |
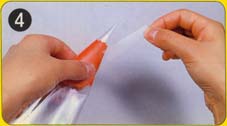 |
Tape the ink Cone, as pictured, to hold in a small cone shape - this make applying easier and keeps the ink concentrated at the end. |
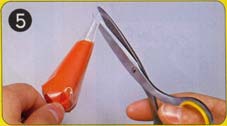 |
Cut the end of the Ink Cone
[in the air pocket] to enable the ink to flow.
For small areas keep a small cut - for larger areas you can increase the rate of flow and make a larger cut. |
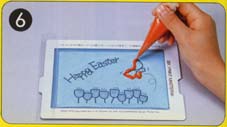 |
Apply the ink to your Print Master by gently squeezing the end of the Ink Cone behind the ink as pictured. |
Using Ink Blocking
|
|
|
|
2. Lift the plastic flap on your Print Master - Ink Blocking is applies to the top/ rough side of the screen |
|
|
|
|
|
|
|