The NEHOC system [both screen printing and PRINT
GOCCO] will print photographs onto fabrics, paper, wood, ceramics
& many other items. This information sheet deals with using a photograph
that has been scanned into a computer.
Update for CS5 Photoshop: Overlaying a dot screen is no longer located in the Printer Options Box as described on this page. Halftone Patterns are now incorporated into the program, enabling live changes to be viewed and aplllied.
Access the 'screens' option through the menus Filter > Sketch > Halftone Pattern
For other version of PhotoShop, check your versions Help Menu's and search for Halftone Pattern.
When printing a photograph you must break the photo down into a range of
fine dots that when printed combine to form the picture [similar to
newspaper print]. If a straight copy of the photo is used without
creating a dot screen over the photo then you will receive no grey scales
and the photo will print as one solid blob with no definition.
There are a number of different factors to take into consideration when
using photographs as artwork as there is no 100% rule you can input and
follow each time - every photograph is different in tone & contrast so
you must adjust your setting to match.
Some photo's can handle a high level of definition, whilst others will
require a coarser screen. The level of final detail also depends on the
item that you are printing - paper will handle a high definition whilst
fabrics/ ceramics are more absorbent so ultra fine detail may be lost[
depends on the design].
The following information should be used as a general guide - your final
results will be a matter of personal preference and computer experience
[plus the abilities of the computer program/ printer options].
Step 1
Open the image in PhotoShop or another suitable
graphic design program that enables you to manipulate images. Convert
the photo to grayscale as this helps to gauge contrast more accurately.
Step 2
Adjusting & manipulating the photo can be
done using two common methods:
Method
1: The most commonly used method is by overlaying a dot
screen over the design using PhotoShop's 'Screen' setting in the Print With Preview
or Print options Box.
This Screen feature is not available on low end
versions of the program and where the printer selected is not capable of
overlaying a screen.
Most laser printers and postscript printers are suitable for screens,
however many early inkjet printers are not capable of this option.
From the Print options box, select Screens [top
left button in the advanced options area at the base of the box right]
this will open up the Halftone Screens option box where the adjustments
can be made.
You will
notice that the dots change size depending on your setting. Set a
lower line frequency, your dots are big - set a higher line frequency,
your dots are small. Some people like the look with the really big
dots.
For
fabrics the frequency range is generally between 40 [large solid areas]
and 65 for fine detail. On paper using 135Mesh or PRINT GOCCO Print
Masters frequency may vary between 45 and 70.
Angle can be changed where ever required and may alter the depth of the
design depending on the frequency. When starting out change only the
frequency to begin with until you have a better understanding of the
line changes on your design.
The normal setting for shape is round as this helps to limit bleed,
however any shape may be used.
It really comes down to what you envision your print as being - you may
need to print out
several variations using different settings [make sure you document the
setting on the back]. If you're inclined to experiment, then pick
2 different ones to flash and print
then compare. You'll learn a lot just by doing this 1 experiment.
Or, you can make 4 small printouts from the laser printer with 4
different PhotoShop settings, fit them all onto the same screen to
flash. Then you'll have 4 different results to compare with.
Method 2: The opacity setting for the layer
can be adjusted and set to around 60% percent, as this gives you an overall lighter image
[less dense with dots in your laser printer output]. Regardless of
what you set this to, the dots are always the same size, there are just
more or fewer of them.
Changing the level/ opacity of the design works
well when printing cards/ paper, however when printing absorbent items
like fabrics, this method is not as effective.
Opacity may not always provide the grey scales required to give a
photograph depth on some items, hence method 1 is most commonly used.
* Additional technical comments supplied by Shu-Ju Wang as
posted to
GOCCO-Printers List
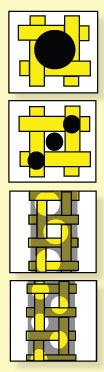
Printable and Unprintable Images: FIRST IMAGE: Printable dot (highlight): Must be larger than one mesh opening plus 1.5 thread diameter to allow for printability regardless of the position of the dot on the screen. SECOND IMAGE: Unprintable dot (highlight): Blocked by threads or too small to be supported by screen. In this example, the angle of the dots relative to the mesh increases the problem. THIRD IMAGE: Printable dots (shadow): Can be as small as one mesh opening but will only print when positioned over an opening. Positioning of dots cannot be predicted or controlled. FOURTH IMAGE: Unprintable dots (shadow): The size and angle can render whole areas of the image unprintable or printable with moiré.
Though moiré can never be completely eliminated, higher mesh-to-dot ratios can reduce the incidence of global moiré. A minimum ratio of 3.5:1 is recommended, but results improve significantly at a ratio of 5:1 or higher. So at 3.5:1, a 65-line/in. halftone would require the use of a 230-thread/in. fabric (3.5 threads/line x 65 lines/in. = 227.5 threads/in.), and, at a 5:1 ratio, a 75-line/in. halftone would require a 380-thread/in. screen (5 threads/line x 75 lines/in. = 375 threads/in.).
 Method
1: The most commonly used method is by overlaying a dot
screen over the design using PhotoShop's 'Screen' setting in the Print With Preview
or Print options Box.
Method
1: The most commonly used method is by overlaying a dot
screen over the design using PhotoShop's 'Screen' setting in the Print With Preview
or Print options Box. For
fabrics the frequency range is generally between 40 [large solid areas]
and 65 for fine detail. On paper using 135Mesh or PRINT GOCCO Print
Masters frequency may vary between 45 and 70.
For
fabrics the frequency range is generally between 40 [large solid areas]
and 65 for fine detail. On paper using 135Mesh or PRINT GOCCO Print
Masters frequency may vary between 45 and 70.