|
|
|
|
| Place mouse over 'Training' menu above to display extra options |
| Page Location: Home > Training > Information Sheets > #28 CMYK Separations with Adobe Photoshop |
|
|
|
|
| Place mouse over 'Training' menu above to display extra options |
| Page Location: Home > Training > Information Sheets > #28 CMYK Separations with Adobe Photoshop |
|
|
|||
|
|
|||
|
|
Creating CMYK Colour Separations with Adobe Photoshop©
Using a computer for CMYK artwork separations is an advanced topic, that is difficult to put onto paper, as computers vary as too the type and version of design program used. In this example Abobe Photoshop [version 5.0] is used, run on a PC [PIII 500Mhz processor, 256Mb RAM, 20Gb HD], especially when there are computer courses are available on these programs just so you can understand the basic features available!
Instructions and information can quickly become very complicated, so for this exercise we will apply KISS = Keep It Simple Stupid!
Let's get started!
Task 1: Changing the Colour Scale
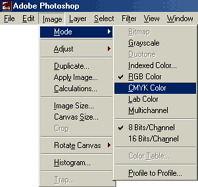 1/
Change the colours of the picture to CMYK. Normally a picture is
set to RGB [Red, Blue, Green] when you scan or import the file.
1/
Change the colours of the picture to CMYK. Normally a picture is
set to RGB [Red, Blue, Green] when you scan or import the file.You have now changed your picture from RGB to CMYK colour settings ready for printing.
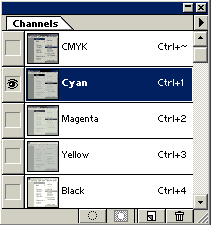 Selecting
Channels
Channels are the different colour separations - also called layers.
In the Channel Window, click the mouse onto the Cyan channel – watch as the picture changes from colour to black & white.
The same change happens for the Magenta, Yellow & Black layers as well.
To print a colour [also called channel or layer], simply click on the channel colour with the mouse, then with the channel highlighted proceed to print as outlined below.
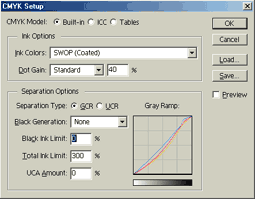 Advanced
Colour Preferences - CMYK Setup
As PRINT GOCCO Paper Ink does not have a Process Black you can change the Black Generation to NONE to produce CMY printing [similar to RISO Artwork Books].
Task
2a: Printing - Older models with basic optionsIt's important to understand all printers provide different printing options – the more advanced your printer the more options may be made available. If you have more memory and functions available you can modify more characteristics of the printing. Example - the ‘Printer Colour Management’ box at the bottom of the ‘Print’ box may be greyed out with older model printers.
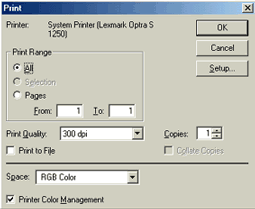 1/
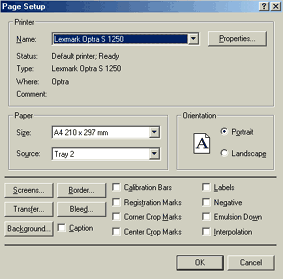
Open the Print options box [pictured right]
With a basic printer the options at the bottom of the Page Setup box will be ‘greyed out’ and you don’t have much ability to manipulate your picture – you’ll just have to stick to Photoshop’s default values for CMYK separations.
With all your options selected/ changes made you can proceed to Print by clicking OK.
Task
2b: Printing - New models with advanced optionsWith newer model laser [plus bubble/ ink jet] printers you have the ability to change more options and take advantage of other features, as your printer can handle many more commands from the computer program.
NB: Printer Colour Management should only be used if you KNOW your printer’s software drivers have CMYK support. If you are unsure simply let the program [Photoshop] do the work.
 2/
Open the Page Setup box [pictured right] by clicking the Setup
button from the Print box
2/
Open the Page Setup box [pictured right] by clicking the Setup
button from the Print boxNow you can manually adjust some of the setting, as you can add registration and crop marks to your print or select from the other available buttons!
What the buttons do [remember you can press F1 for help]:
BACKGROUND: Select a colour to be printed as a background outside the picture area.
BORDER: Lets you print a black border around the picture.
BLEED: Lets you print crop marks inside rather than outside the image.
CALIBRATION BARS: Prints an 11-step grayscale, a transition in density from 0 to 100% in 10% increments. With a CMYK color separation, a gradient tint bar is printed on the left of each CMY plate, a progressive color bar on the right.
CROP MARKS: Where the page is to be trimmed. You can print crop marks at the corners, at the centre of each edge, or both
LABELS: Prints the file name and channel name on the image.
TRANSFER: Lets you adjust the transfer functions, traditionally used to compensate for dot gain or dot loss that may occur when an image is transferred to film. Generally, it’s best to adjust for dot gain using the settings in the CMYK Setup dialog box.
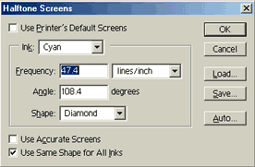 SCREENS
[pictured left]:
This is the option you will commonly use with CMYK printing, as this options
enables you to change the frequency, angle and shape of the dots that the
computer generates to make up the separations.
NB: The preferred Shape configuration for process printing is Round
With all your options selected/ changes made you can proceed to print by clicking OK.
Summary
If you are after a magic formula that gives a perfect result every time - we don’t think one exists! All pictures vary [colours/ density/ size/ etc.] so changing the settings, testing and playing with these features is quite fun and quickly gives you a few different results.
Can you expand on the information above, explain a point more directly or think we have missed something - we would be pleased to hear from you E-mail us now