|
|
|
|
| Place mouse over 'Training' menu above to display extra options |
| Page Location: Home > Training > Information Sheets > #14 Imaging B6 Print Masters with PG-11 |
|
|
|
|
| Place mouse over 'Training' menu above to display extra options |
| Page Location: Home > Training > Information Sheets > #14 Imaging B6 Print Masters with PG-11 |
|
|
|||
|
|
|||
|
|
|||
|
|
|||
|
|
Imaging B6 Print Masters with PG-11
Firstly, you must have your artwork prepared ready for imaging - see Artwork Types & Preparation if unsure - this being a carbon original free of moisture.
 Remove Registration Plate from the machine
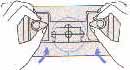
Center the Alignment Guides in the PG-11 Pad Table and lock into the home position.
 Insert B6 HM Print Master, sliding in with the plastic facing the stage glass
[smooth side facing you] from the right. Ensure the Print Master slides in under the Master Guides around the Stage Glass.
Insert B6 HM Print Master, sliding in with the plastic facing the stage glass
[smooth side facing you] from the right. Ensure the Print Master slides in under the Master Guides around the Stage Glass.
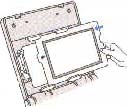
Place your artwork onto the PG-11 Pad Table, using the Paper Guide if possible to ensure perfect registration instantly.
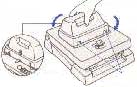 Insert Print Lamps into Lamp Housing.
Insert Lamp Housing into PG-11 Machine by sliding in the back first and then lowering the front [The front being the side with the two metal tags]
Place the palms of your hand on the two front corners and push down until the machine flashes - HOLD THE UNIT DOWN FOR 4-5 SECONDS or until the lamps stop cracking. This allows the heat to correctly image the design.
Lift the handles back to a resting position and remove the Lamp Housing - CAUTION the Print Lamps will be hot. Place the Lamp Housing face up so excess heat can freely escape - if you have gloves, or tough skin, you can remove the Print Lamps from the Lamp Housing at this stage.
Lift the lid of the PG-11 and remove the Print Master ready for Inking.
It's that simple and easy to make a Print Master - Just ensure that your artwork is prepared and free of moisture for the best result every time.