|
|
|
|
|

|
|
| Place mouse over 'Training' menu above to display extra options |
| Page Location: Home > Training > Wedding Stationery with PRINT GOCCO |
|
|
|
|
|
|
|
| Place mouse over 'Training' menu above to display extra options |
| Page Location: Home > Training > Wedding Stationery with PRINT GOCCO |
|
|
||
|
|
||
|
||
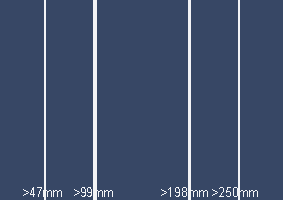
For a 3 fold card an A4 [210 [H] x 297mm [L]] piece of paper must be scored/ folded at exactly 99mm and 198mm. To make the door type fold two extra folds must be placed at 47mm and 250mm - this will allow just a little room for adjustment when all folded together.
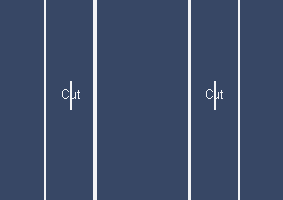
Next you need to cut the slots for the ribbon. This is done at 75mm and 225mm - plus between 85mm and 115mm down the card so the ribbon is centered in the inner folds. [I actually created a template with a piece of paper for the cuts when doing the bulk of the Invitations.]
IMPORTANT: At this point in your actual production/ printing, you would print your design onto the outside of the card BEFORE inserting the ribbon and sealing the card as detailed below.
There are hundreds of ribbon types available, so choosing the colour is easy but then you need to choose the type - solid, edged, etc.
Cut your ribbon to a length of 60cm - use an angled cut for a great effect.
Slot this through the cuts so that the ribbon is visible in the centre of the card and behind the outer edged of the card.
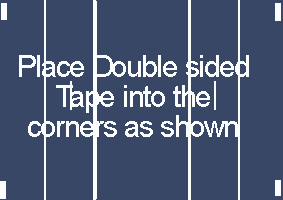
To seal the card & create the 'door' effect I a simply attach double sided tape to the 4 corners as shown.
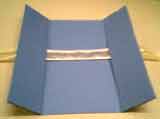 The
tape is removed and the edged folded inwards OVER the ribbon - so the ribbon
is only viewed in the centre panel.
The
tape is removed and the edged folded inwards OVER the ribbon - so the ribbon
is only viewed in the centre panel.
You have now completed your outer card ready to place the insert inside.