|
|
|
|
|

|
|
| Place mouse over 'Training' menu above to display extra options |
| Page Location: Home > Training > Wedding Stationery with PRINT GOCCO |
|
|
|
|
|
|
|
| Place mouse over 'Training' menu above to display extra options |
| Page Location: Home > Training > Wedding Stationery with PRINT GOCCO |
|
|
||
|
|
||
|
||
 For a 3 fold card each panel is 99mm width - The insert needs to
be highlighted, so a 5mm border around this should look great. This means the insert is
actually 89mm [W] and 200mm [H].
For a 3 fold card each panel is 99mm width - The insert needs to
be highlighted, so a 5mm border around this should look great. This means the insert is
actually 89mm [W] and 200mm [H].
Using a guillotine I cut the A4 paper down to size.
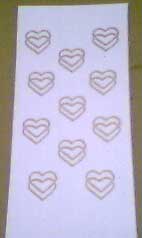
I am using the same heart design throughout the wedding so I will place as many hearts on the paper as possible [and that will fit into a B6 Print Master]. My text overlay actually works out to fit over the hearts perfectly with space at the top and bottom for the black printed hearts on the text overlay.
Using the template created in PageMaker, the insert size is already marked, along with the hearts locations, so making a Print Master in the PRINT GOCCO is very straight forward. Simply line up the edges along the pad, however with a PG-11 at hand there is simply no better system available as you get perfect registration on every print - and with 2mm on each side to play with the registration had to be perfect.
PG-11 was ideal and as the picture illustrates, the gold hearts were simply printed onto my cut paper. Of course you don't need to make things so hard for yourself - make the hearts closer to the centre of the page and leave a little more room on the edges - but when you want to push the system to it's limit, the PG-11 doesn't let you down!
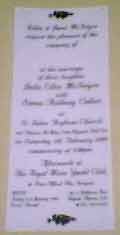 With a 3 fold card and insert already done, all that is left is
the Text Overlay to be placed over the insert.
With a 3 fold card and insert already done, all that is left is
the Text Overlay to be placed over the insert.
You can buy tracing paper with pre-printed flowers, etc on them, but that defeats the point as we have already printed the background we want on our insert.
Buy a few sheets of clear tracing paper - preferable pre-cut A4 size as this makes sticking them through the laser printer really easy.
Remember to make your prototype before you begin - The first lot of tracing paper I bought was actually too thin and buckled/ curled from the heat of the printer. I stepped up to a thicker grade of paper in A1 sheets [$2.75ea] and then cut them down to size myself. These larger sheets were bought from a local art shop who had a few different types.
Using the template created in PageMaker, I have placed 2 small dots a further 5mm in on the Text overlay as this is where my pins will go. In addition I have added a different Heart logo at the top and bottom to 'fill in' the area not covered by the gold heart back ground.
With 3 copies of my Text Overlay on the one page prepared in PageMaker, I simply print using the laser printer onto the tracing paper. Again a 5mm border is desired so the Insert paper colour can be highlighted, so our Text Overlay's measurements are 79mm [W] and 190mm [H].
Using a guillotine cut the printed Text Overlay down into the 3 pieces - the 5mm dots also help for registration in this process.
Now we can start putting it all together!!