|
|
|
|
|

|
|
| Place mouse over 'Training' menu above to display extra options |
| Page Location: Home > Training > Wedding Stationery with PRINT GOCCO |
|
|
|
|
|
|
|
| Place mouse over 'Training' menu above to display extra options |
| Page Location: Home > Training > Wedding Stationery with PRINT GOCCO |
|
|
||
|
|
||
|
||
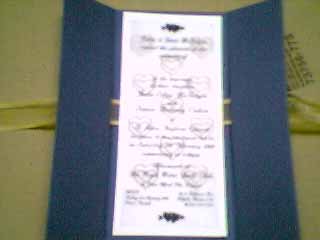
Now you have created [or partly designed for your prototype] the 3 parts of the invitation they must be put together.
The final presentation can also make your Invitation highly professional by simply adding a few different pieces.
Step 1
I have seen Gold pin used to gold together Invitations before, but these go all the way through the card and stick our the back - Not very attractive and they get caught on everything - so I have to improvise and add an additional step.
 Firstly,
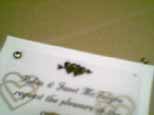
take one of the Insert Inserts with the Gold hearts and one of the Text
Overlay's. Place the Text Overlay on top and position so Text Overlay edges
are square, then pierce with a Gold Pin where the black mark has been printed
5mm in.
Firstly,
take one of the Insert Inserts with the Gold hearts and one of the Text
Overlay's. Place the Text Overlay on top and position so Text Overlay edges
are square, then pierce with a Gold Pin where the black mark has been printed
5mm in.
Once you have done one side repeat the process on the other, open the pins and flatten to secure.
This method attached the Text Overlay to the Inner Insert in an attractive manner.
Step 2
 Place
double sided tape over the back of the pins - covering the complete top edge
of your combined Inner Insert/ Tex Overlay.
Place
double sided tape over the back of the pins - covering the complete top edge
of your combined Inner Insert/ Tex Overlay.
This combined insert must now be attached into your Outer Card [with Ribbon behind] by removing the double sided tape and placing onto the Outer Card.
Registering the placement is easy as there is a 5mm gap around the insert. You can use a ruler if required, but generally you get it spot on registering it by eye.
Step 3
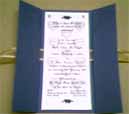 You
can now close your card and prepare to tie the ribbon ready for presentation.
You
can now close your card and prepare to tie the ribbon ready for presentation.
Don't forget if you have not already printed the persons name on the insert - write it now and attach to their envelope!
Once you close both halves of the card, flatten with a round object - back of scissors - to crease the card so it remains flat.
Step 4
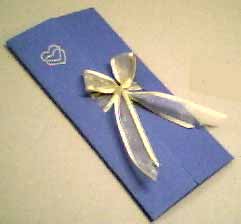
You can now tie the bow - which can be an art in itself if needed!