Create and Print
Window & Cafe Style Curtains
-
- The following project
combines PRINT GOCCO with the versatile and simple to use Stamp Kit for
Cloth.
- Here’s a simple to follow guide that
will transform any crafty person into a craft maker - You can easily
substitute the colours and designs to suit your personalised needs.
Equipment
You can use either
stamp printing or screen printing techniques to place your designs onto the
fabric.
- PRINT GOCCO or RISO
ScreenFax to image Screens
- If Stamp
Printing
- Stamp Kit for
Cloth or Hand Stamper
- Stamp Inks for
Cloth
- B6 Print Master
[1 for each design]
- Print Lamps [2
for each design]
- If Screen Printing
- RISO ScreenMaster, Frame Mount, Squeegee and Ink
- RISO ScreenMaster
70 Mesh
- Frame Mount
[sized to suit design]
- Squeegee
- Fabric Screen Printing Ink [colour as desired]
- Print Lamps [2
for each design]
Materials
- Window
Curtain -
~ 90cm wide white cotton or curtain
material to length
Cafe Curtain -
~ 44cm wide white cotton
or curtain material to length
Preparation
 Window
Curtains
Window
Curtains
-
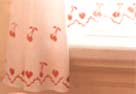
- Step 1
- Print your design onto the material in the
lower end as illustrated.
- Step 2
- Fold both sides of the 90cm wide material
1.5cm and stitch to complete edges.
- Step 3
- Machine stitch button holes at 14cm
intervals, beginning 3cm in from side.
- Style of curtain ring may vary placement
of button hole height.
 Cafe
Curtains
Cafe
Curtains
- Step 1
- Print your design onto the material in the
lower end as illustrated.
- Step 2
- Triple fold both edges and machine stitch.
- Step 3
- Machine stitch button holes at 15cm
intervals, beginning 1.5cm in from side. Style of curtain ring may vary
placement of button hole height.
When
using curtain rods
Instead of machine stitching
button holes you can leave the top edges open for a curtain rod to be inserted
along the top fold.
Remember you may need to adjust the pattern
to match the thickness of the rod, so measure first.